How To Read a Check: A Beginner’s Guide
 Written by
Jacob Wade
Written by
Jacob Wade
 Edited by
Melanie Grafil, M.A., CFHC™
Edited by
Melanie Grafil, M.A., CFHC™

Commitment to Our Readers
GOBankingRates' editorial team is committed to bringing you unbiased reviews and information. We use data-driven methodologies to evaluate financial products and services - our reviews and ratings are not influenced by advertisers. You can read more about our editorial guidelines and our products and services review methodology.
20 Years
Helping You Live Richer
Reviewed
by Experts
Trusted by
Millions of Readers
Paper checks may seem outdated these days, but they still play an important role in many financial transactions. Whether you’re setting up direct deposit, arranging a wire transfer or keeping records, knowing how to read a check is a life skill you should have.
Below, you’ll see each part of a check and where to find information, like your routing and account numbers.
What Are the Parts of a Check?
Checks have 12 distinct parts with important information in each. The parts of a check include:
- Personal information
- Payee line
- Dollar box
- Check amount — written out
- Memo line
- Date line
- Signature line
- Bank name
- Routing number
- Account number
- Check number
- Bank’s fractional number
The 12 Parts of a Check You Need to Know
Traditional checks have 12 distinct sections that contain information that you need to know. Whether you’re cashing a check, or writing one yourself, here’s the part of a check you need to be familiar with:
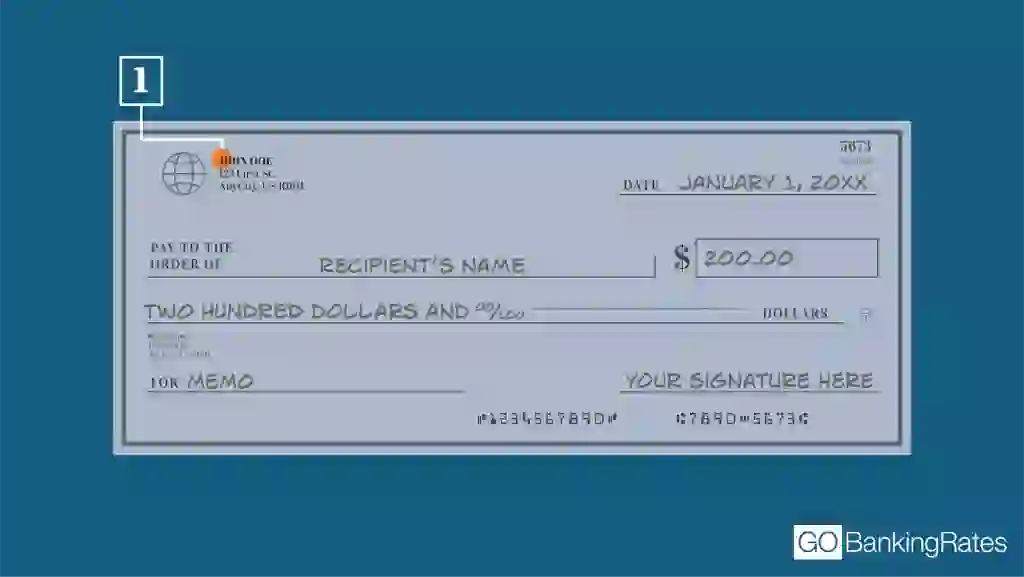
1. Personal Information
In the upper left corner, you’ll see the name and address of the check’s owner. This identifies who the checking account belongs to. This may include two names if the account is a joint account.
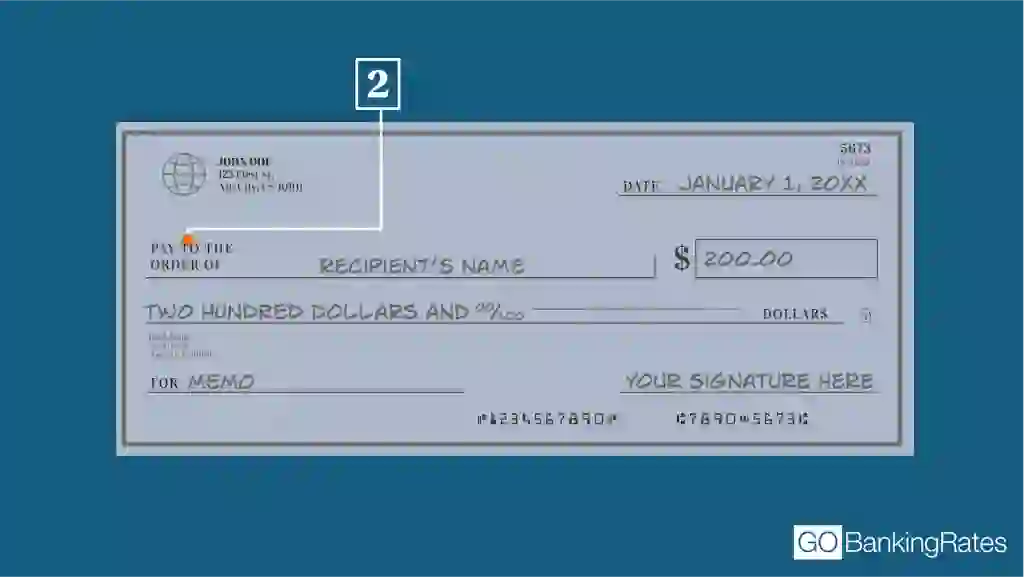
2. Payee Line
Below the personal information, you’ll find the phrase “Pay to the Order Of.” This indicates who will receive the money. If the check is made out to you, endorse — or sign — the back only when you’re ready to cash or deposit it. Doing so too early can pose a security risk if the check is lost or stolen.
3. Dollar Box
The dollar box — usually to the right of the payee line — displays the numerical value of the check, for example, “$20.65.” This box may be labeled “Amount,” as it represents the value of the check itself. Make sure to write the amount as close to the left edge of the box as possible, so no one can alter the figure.
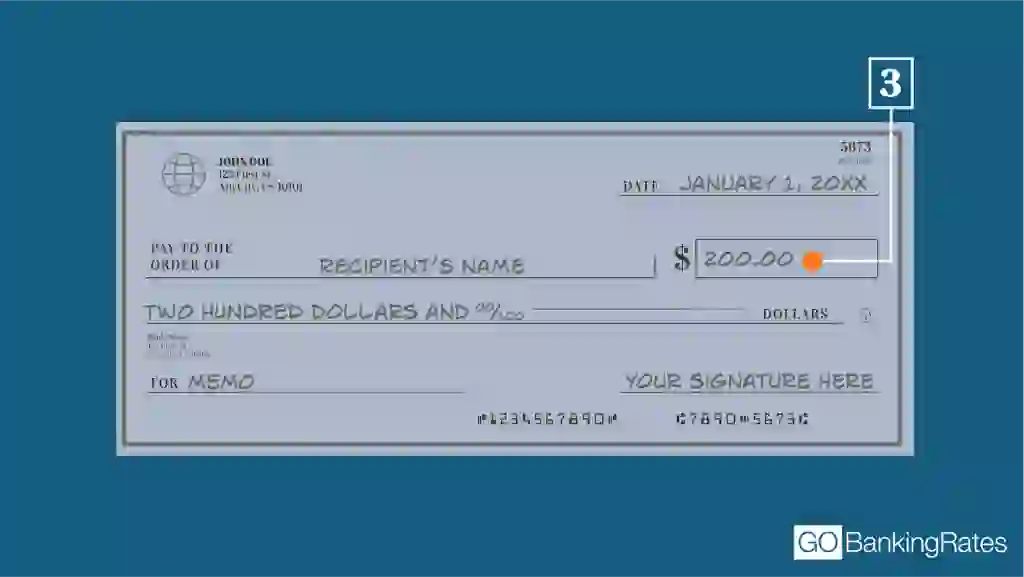
Begin writing as close to the left side of the box as possible, with the dollar sign snug against the first number. You don’t want someone to alter the check to $2,220.65.
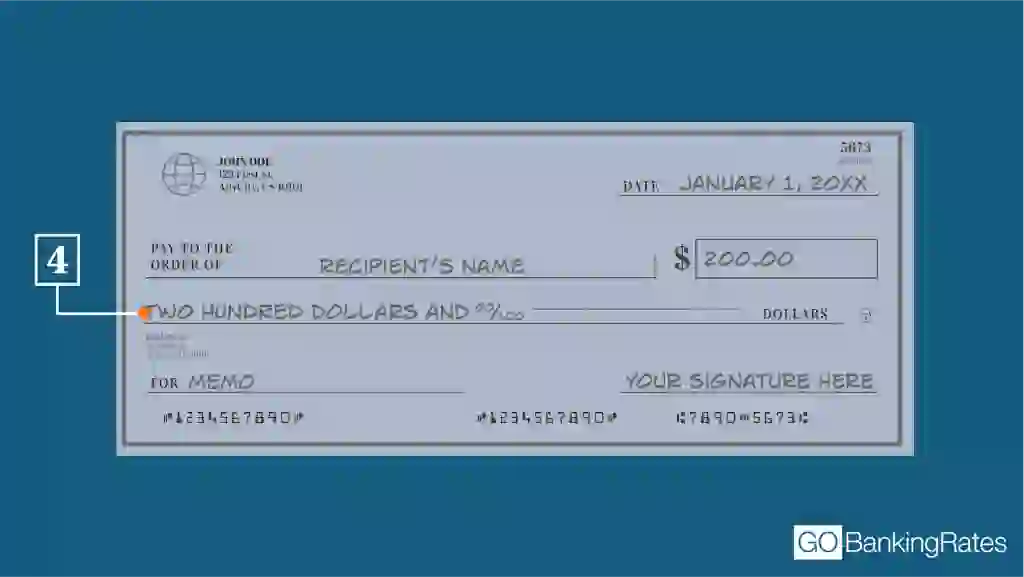
4. Check Amount — Written Out
Directly below the payee line, you’ll see a line to spell out the check’s amount in words. Cents should still be written in numerical form as a fraction.
For instance, write “Twenty dollars and 65/100” for a $20.65 check. If space remains after writing the amount, draw a line through it to prevent any alterations.
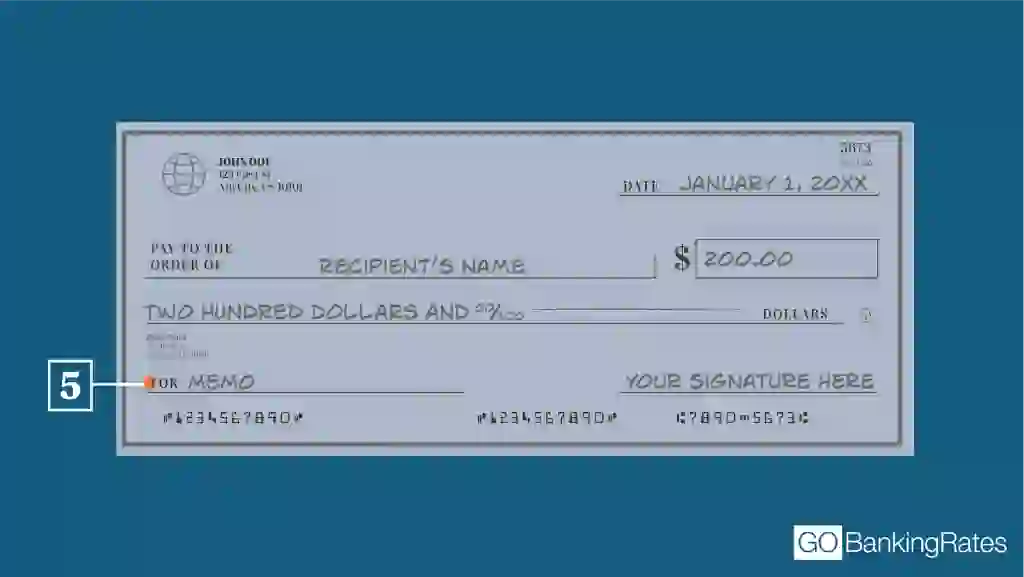
5. Memo Line
The memo line is optional, but helpful for noting why the check was written. For example, if you’re paying rent, you might write “September 2025 Rent” to track that month’s payment. This can help you keep your records accurate — and it will show up on the check copy.
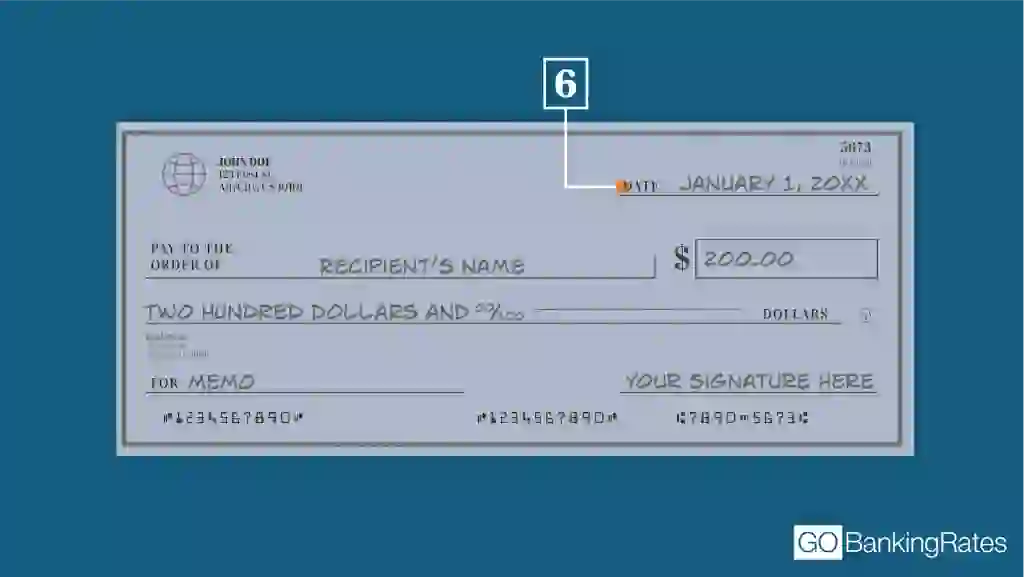
6. Date Line
This is the date the check is written. Some people postdate checks if funds won’t be available until a specific future date. However, banks can often still process a check immediately. Most checks expire after around six months after the check date, so make sure to cash any checks before expiration based on the date line.
Sometimes, the paying party might postdate the check to indicate when the payee should cash it. For example, you might make out the check on March 5, but write March 15 on the date line. This is often done if account funds won’t be available until a specified future time.
Although the payee potentially could take this as a direction to wait before cashing a check, the check is valid from the moment it’s signed by the issuer. The payee doesn’t have to wait until the date on the date line to cash the check.
If the payee attempts to cash the check before the date on this line and the check bounces, the person who wrote the check and the one who cashes it could face fees from their bank.
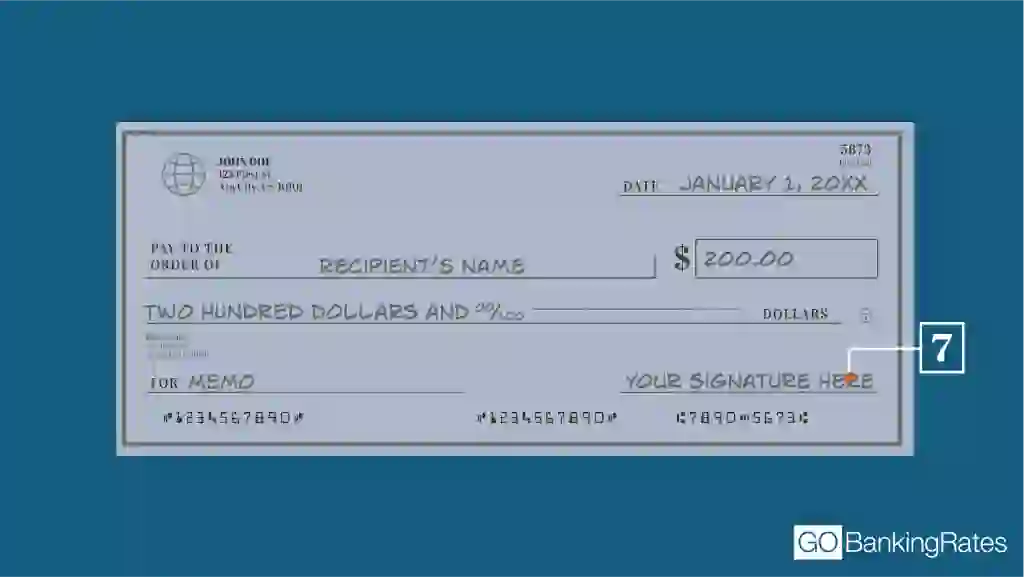
7. Signature Line
The account holder, or issuer, signs here to authorize the payment. This signature validates the check, and the signature will not be transferred to the check copy under the original check.
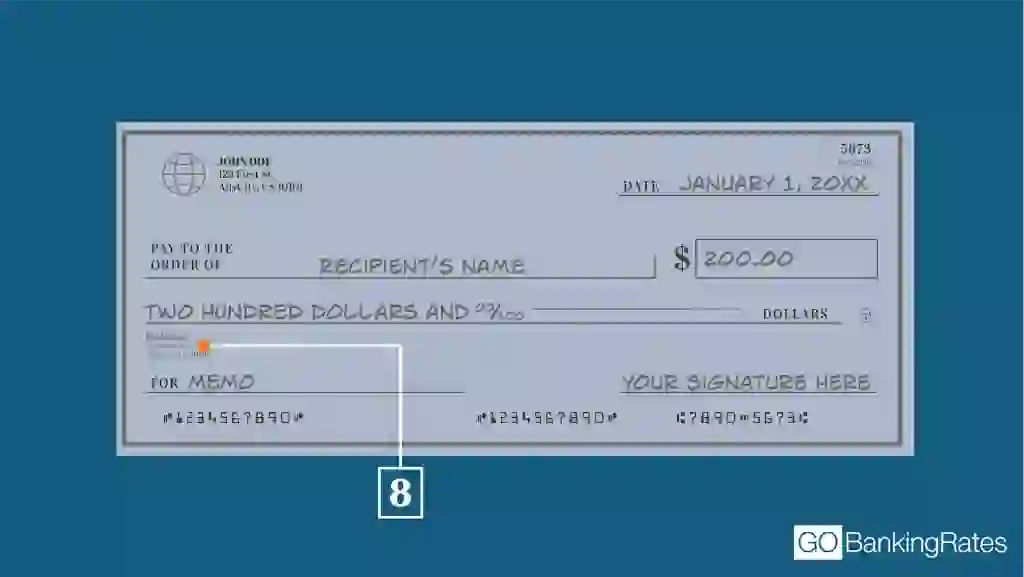
8. Bank Name
You’ll find the bank’s name somewhere on the check, often in the bottom left area. The bank’s address and phone number may be listed as well. If you have questions or concerns about a check’s validity, contact the bank listed.
9. Routing Number
The first set of digits at the bottom of the check is the routing number, usually nine digits long. This number identifies the bank and is required to set up direct deposit and electronic payments.
Banks usually have one routing number for personal accounts, but may have different routing numbers for different types of accounts.
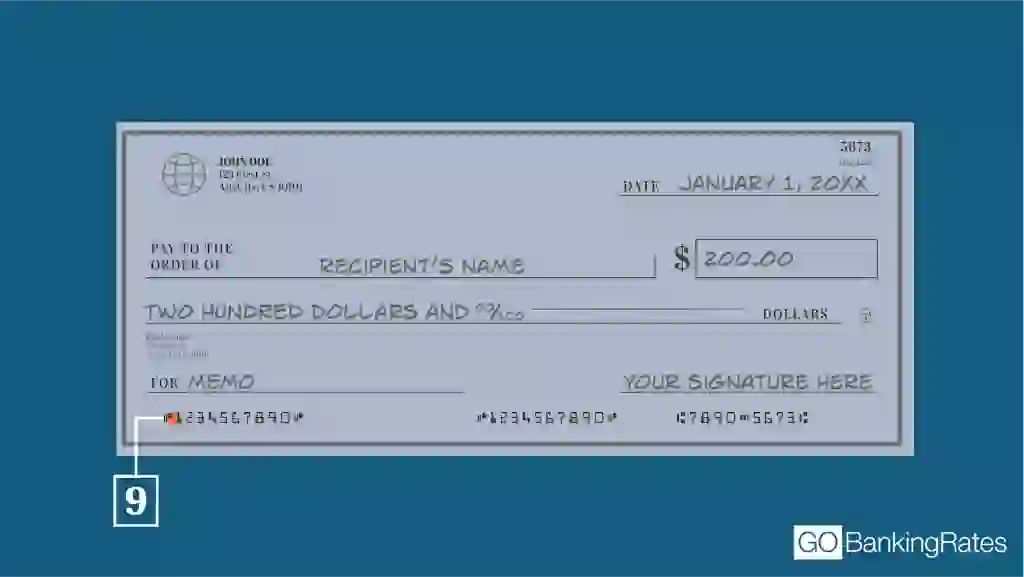
If you’re wondering how to read a routing number on a check, focus on the first set of digits at the bottom. You’ll use this number to set up direct deposits and recurring payments. Some banks will have more than one routing number, depending on their size, so always make sure you’re using the correct one before setting up these types of payments.
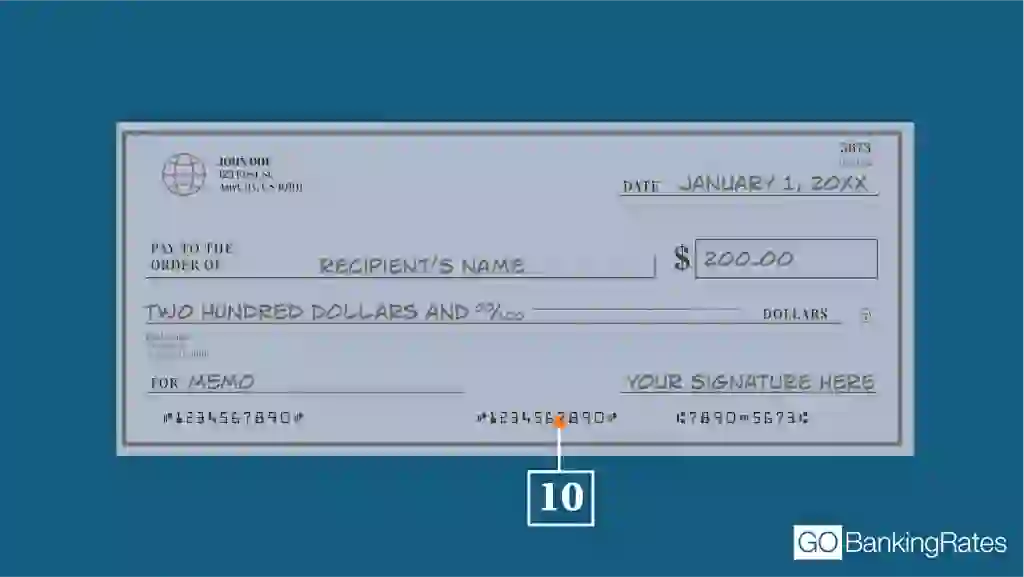
10. Account Number
The second set of digits along the bottom is your account number, which links directly to the checking account from which the funds will be withdrawn. Remember to keep this information protected, as thieves can obtain this information from a discarded check or checkbook and attempt to steal funds directly from your account.
11. Check Number
You’ll see a check number in two places: the bottom right corner as the last set of digits and the top right corner. Each check has a unique number to help track payments.
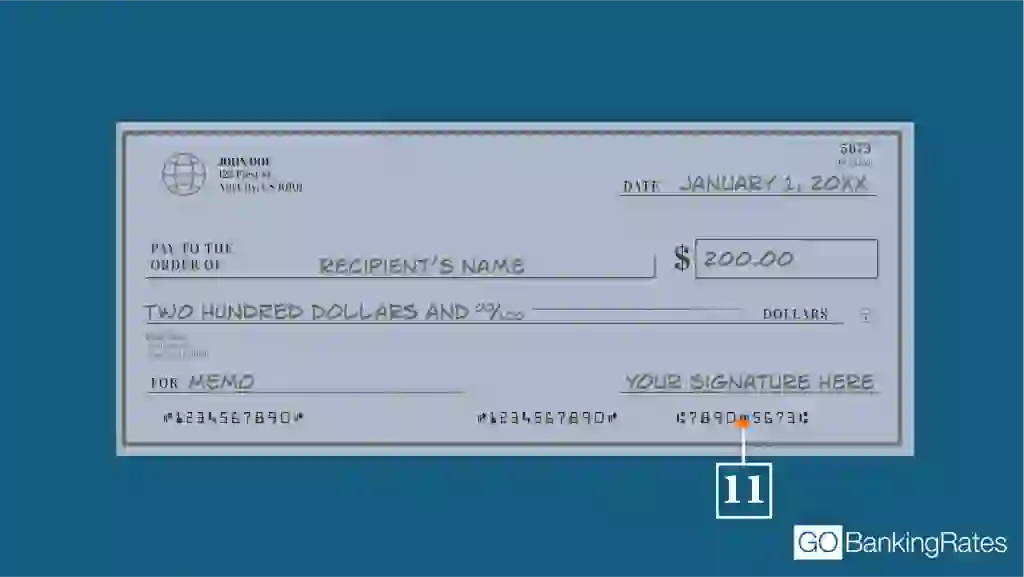
12. Bank’s Fractional Number
Toward the top right corner, you may notice a fractional number containing parts of your routing information. This was more commonly used in the past. Today, it’s not frequently referenced, because the routing number and account number already help identify the source of the funds properly.

How To Read a Check: Step-by-Step Guide
Here’s the steps you need to check to properly read a check:
- Locate the personal information to identify the account holder: Make sure you’re cashing a check from the correct account holder.
- Find the payee line to see who the check is made out to: If you’re receiving a check, it’s important the check has your full name — or the name of your company — written out on the Payee line.
- Check the dollar box and written amount for payment details: To ensure the check is the proper amount, you’ll need to verify both the dollar box amount — numbers — and the written amount, which is the amount written in words, and make sure they both match.
- Verify the date line to ensure the check is valid: Check dates matter, and most checks expire after 60 to 90 days of being written. Make sure the date is valid and the check can be cashed.
- Look for the signature line to confirm authorization: If a check isn’t signed, it isn’t valid. Make sure the signature line is signed properly before attempting to cash.
- Identify the routing and account numbers at the bottom: Both routing and account numbers verify which account the check is withdrawn from. If these numbers are missing, the check is not valid.
Routing and Account Numbers: What You Need To Know
Routing and account numbers are specific identifiers that tell banks how to transfer funds, and which account to withdraw from when cashing a check. Here’s how they work:
- Routing number: Identifies the bank the funds are coming from.
- Account number: Links to your specific account to withdraw funds from.
If you’re depositing a check electronically, don’t mix up these numbers or your check won’t get deposited.
How To Find Your Account and Routing Numbers if You Don’t Have a Check
If you don’t have a physical check handy, you can still find your routing and account numbers by:
- Using the ABA routing number lookup tool
- Checking your bank’s website
- Using your bank’s mobile app
- Reviewing your monthly bank statement
- Calling or visiting your bank in person
You can also locate your account and routing numbers on your monthly bank statement. Alternatively, you can call or visit the bank to find out your routing and account numbers.
Final Takeaway: Why Knowing How To Read a Check Matters
Understanding how to read a check is a simple yet essential skill that can save you time and prevent costly mistakes. Whether you’re setting up direct deposits or verifying payments, knowing where to find key details like the routing and account numbers ensures smooth financial transactions.
Erika Giovanetti and Caitlyn Moorhead contributed to the reporting for this article.
Our in-house research team and on-site financial experts work together to create content that’s accurate, impartial, and up to date. We fact-check every single statistic, quote and fact using trusted primary resources to make sure the information we provide is correct. You can learn more about GOBankingRates’ processes and standards in our editorial policy.
- FDIC "Is Digital Banking for Me?"
- PNC Bank "How to Endorse a Check"
- U.S. News and World Report "What Is a Postdated Check and How to Use One"
- American Bankers Association "ABA Routing Number"
- American Bankers Association "ABA Routing Number Lookup"